| ||
Add Video Clip to Blog
Update: Blogger released a new Add Video feature which allows you to upload videos into your Blog posts. Should you want to know more about it, or resize or align the video, or put it into the sidebar, you may follow our guide in Customize Video Upload in Blogger.
This is a step-by-step guide on how to add a video or movie clip to your Blog or webpage. There are many sites that offer free video hosting. Most of them automatically generate the relevant HTML code for you to easily insert/embed into your web template or blog post. I shall start with two of the most popular providers – Google Video and YouTube.
Google Video
Create an account with Google Video using your Gmail account. After the formalities, you will see a Video Status page. Click "Upload Video."
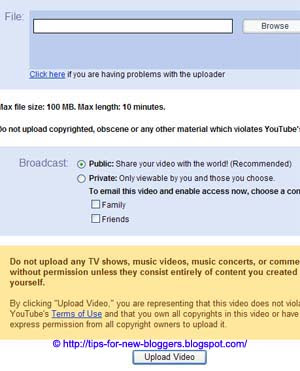
If your file is less than 100MB, which is probably the case, use the Web-based uploader.
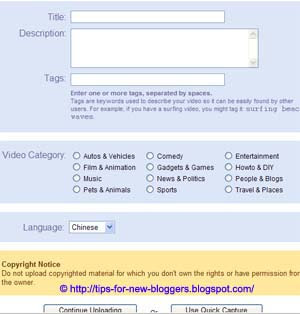
Insert the video title, description, genre, and language. Under “Access”, you can either choose to have the video made public or unlisted.
The “unlisted” function is rather useful. A public video is listed in the Google Video search directory, and anyone can view it. However, you may have a video which you would rather not share with everyone except your blog readers. If you had created a private blog accessible only by your family and friends, you would all the more want to unlist your video.
In case you are wondering, an “unlisted” video enjoys the same features of a public video. It can be embedded in web pages, emailed, or linked to from other public sites.
After you have uploaded your video, you will see a link that reads “Embed this video on your website or blog.” Click on that and copy (Ctrl-C) this code to paste into your post. Your code should look something like this.
<embed style="width:400px; height:326px;" id="VideoPlayback" align="middle" type="application/x-shockwave-flash" src="http://video.google.com/googleplayer.swf? docId=-6608265653837650172&hl=en" quality="best" bgcolor="#ffffff" scale="noScale" salign="TL" FlashVars="playerMode=embedded"> </embed> |
|---|
If you would like, you can change the width and the height of the video screen so as to have it fit neatly into your page. I have created an account and uploaded a sample video just to let you see how it will look on your site. The video screen you see below has a width of 300px and height of 245px.
YouTube
You would have heard of this popular video-sharing platform. Although Google has now acquired YouTube, it does not appear to be the end of Google Video. If you do not have an account at YouTube, sign up for a free account. For first-time users, you would need to confirm your email by following the instructions that YouTube sends to your email account. After confirmation, you will be able to upload your videos.

In YouTube, you assign tags to your video to enable it to be easily found by viewers through their search function. At the second step, select “public” viewing.

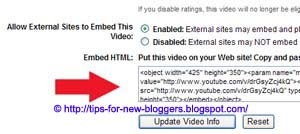
When you are at the screen shown below, you will see towards the bottom an option for you to “allow external sites to embed and play the video.” Check that box. Copy (Ctrl-C) the generated HTML code and insert it into your post.

Should you want your video to be a permanent feature of your site layout, you can create a video widget. For instance, if you would like to have a video in your sidebar, login to your Dashboard, go to Template-> Page Elements. Add a “Page Element” and select “HTML/JavaScript”. Paste the generated HTML code and save. (Note: Whenever you create any new page element, it will always appear at the top of all the other elements. If you want it near the bottom, simply drag and drop it to the desired location.)
Your HTML code will look like this.
<object width="425" height="350"> <param name="movie" value="http://www.youtube.com/ v/QjA5faZF1A8"></param><param name="wmode" value="transparent"></param><embed src="http://www.youtube.com/v/QjA5faZF1A8" type="application/x-shockwave-flash" wmode="transparent" width="425" height="350"></embed></object> |
|---|
Again, you can change the width and the height of the video screen if you'd like. For the purpose of this guide, I have used one of my favorite YouTube videos, a hugely popular clip of an electric guitar version of Pachelbel's Canon in D. The video screen has been reduced to a width of 300px and height of 245px.
Other video host sites
The other video hosts you might want to check out are:-
1. Yahoo Videos which is increasingly popular. Its interface resembles Google Video and you should find it easy to use.
2. Live Video, a new YouTube clone but with innovative features such as Digg-like voting by its users, customizable profile pages, and backgrounds to go with your videos.
3. Grouper which incorporates a desktop software for you to edit your videos before uploading them to the site.
4. Metacafe, iFilm, Motionbox, and Dailymotion are also popular video hosts which you can consider using.
If you need more information, enter search words like “free video share” to look at what these or other sites have to offer.
Further reading:
If you are looking to have music on your blog, you may check out our other article Add Music to Blogspot blog. Should you want to insert a music playlist of several songs, have a look at the article Flash Music Player and Music Playlists.
© Tips for New Bloggers
posted by Computer @ 10:36,
![]()
![]()

